This article breaks down the exact process I’ve used to deploy an LLM. It’s given me tighter control over company data and outputs free from hallucination which are tailored perfectly to my needs.
Feel free to follow my process and adapt it to yours. It’s simple to follow but if you do get a little lost in the weeds, don’t hesitate to reach out.
👋Hi, I’m David Berrio, Senior ML/AI engineer here at HatchWorks AI. I’m obsessed with all things AI and language models, spending much of my time learning how to leverage them to improve client software projects, our own processes at Hatchworks AI, and my personal hobbies.
Short on time? Get the highlights with these four key takeaways:
- Local LLM deployment offers better data control, regulatory compliance, and customization options.
- The process involves 7 steps, including setting up the environment, building a knowledge base, and using a vector database.
- Your vector database will be set up to take the user query and source reliable information from your knowledge database. This is how you get responses free from hallucination while also getting the best from the LLM itself.
- HatchWorks AI can teach your team how to deploy LLMs locally for any use case or can do it for you from start to finish. All you need to do is get in touch to learn more.
Watch the full webinar:
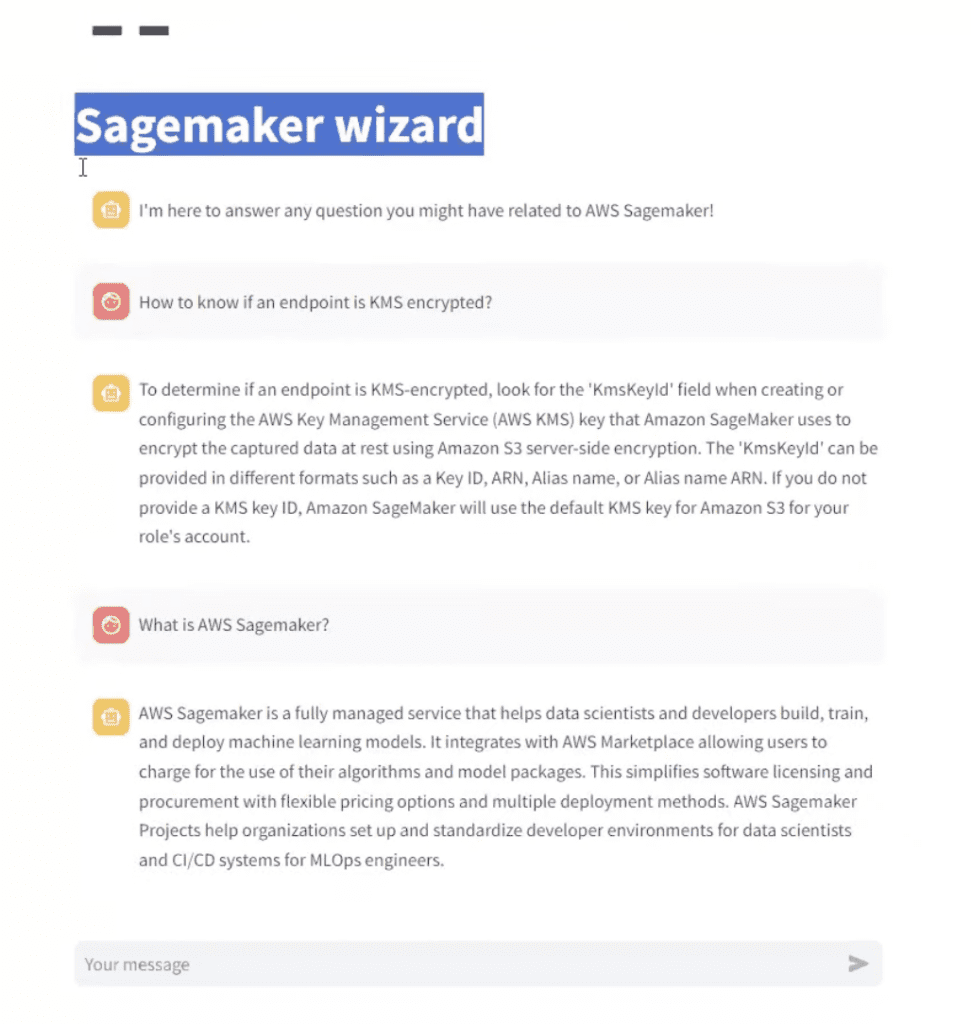
This article is based on my 1 hour long webinar on the same topic where I show step-by-step how I’ve built a SageMaker Wizard that can answer any question a developer may have about using Amazon SageMaker.
📽️ Watch it here.
Why Bother Deploying an LLM?
At a glance:
Better data control
Easier regulatory compliance
Faster responses
Optimization of resources
Customized to your needs
Easier experimentation
Cost effective
If the idea of deploying a Large Language Model feels daunting compared to using a ready-made cloud-based system like ChatGPT-4 then this section is for you.
First, let me say that it’s not as daunting of a process as you think. The 7 steps I outline a little later will make that clear.
Second, any effort you do put toward localizing an LLM will be well spent.
And that’s because deploying an LLM locally:
- Gives you complete control over your data (something your Legal or InfoSec team will thank you for).
- Makes it easier for you to be compliant with stringent regulatory requirements for data protection such as GDPR or HIPA.
- Optimizes the usage of your local hardware resources, ensuring the model runs as efficiently as possible.
- Creates a custom solution where you can fine-tune the model with your data, adjust inference settings, and integrate with bespoke systems.
- Provides a sandbox environment for experimentation without limitations or restrictions that might be imposed by third-party cloud providers.
- Saves you money for high-usage scenarios where continuous API calls to a cloud service would be expensive.
I really want to stress that last point. If you plan on using an LLM for a high frequency task, it can quickly add up to a substantial monthly expense, especially if you’re dealing with tens or hundreds of thousands of interactions.
For example, ChatGPT-4 is about $10 per million token input and $30 per million token output.
By deploying your own LLM, you make a one-time investment in hardware and software, which can be far more economical in the long run compared to the ongoing costs of cloud services.
This means more predictable budgeting and significant savings over time.
How to Deploy an LLM Locally Using RAG – 7 Simple Steps
In the HatchWorks AI Lab I ran on this same topic, I explain how to deploy an LLM on your machine using Retrieval Augmented Generation (RAG).
What is RAG?
Retrieval-Augmented Generation (RAG) is a technique that improves the responses of AI language models by combining them with a search system.
This search system looks through a large collection of documents to find relevant information. By using this extra information, the AI can give more accurate and up-to-date answers, instead of relying only on what it already knows.
I’m going to do the same thing here using a use case where we need a chatbot that answers queries about all things Amazon SageMaker.
Amazon SageMaker is a cloud-based machine-learning platform that allows the creation, training, and deployment by developers of machine-learning models on the cloud.
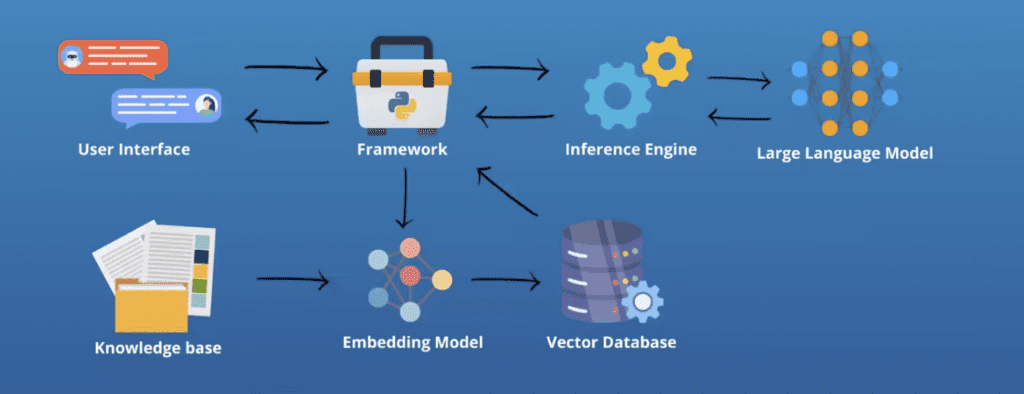
Your use case will surely be different but the RAG process you follow will be the same. And that process will need:
- A user interface
- A framework
- An inference engine
- An LLM
- A knowledge base
- An embedding model
- A vector database
You can see the relationship of those below:
Step 1: Install All Necessary Software and Set Up Your Environment
Before you begin, you need to create an environment where you can deploy an LLM.
This environment must support various components that are essential for the model to function effectively.
Here’s what you’ll need:
- GPU: A powerful consumer-grade GPU (e.g., RTX 4090) is recommended to handle the intensive computations involved in running large models. Ensure you have the necessary drivers and CUDA installed. You don’t need a GPU but response generation might be slower without it. An alternative could be to use Apple Silicon-like M series processors. They’ll do a great job with llama.cpp inference engine providing response speed similar to some of the consumer-grade GPUs.
- Memory and Storage: Adequate RAM or VRAM if using GPU (32GB recommended) and fast storage (preferably SSDs) are necessary to handle large datasets and models.
- Integrated Development Environment (IDE): Tools like Visual Studio or PyCharm are recommended for writing and managing your code efficiently. These IDEs provide robust support for Python, debugging tools, and integration with other essential tools.
- Version Control: Using Git for version control helps manage changes to your code and collaborate with others.
- Python: The primary language for deploying LLMs, due to its extensive library support for machine learning and AI. Ensure you have Python 3.8 or higher.
- Framework: We use the LangChain framework to streamline the integration and management of our LLM.
- Essential Libraries: Install libraries such as torch for PyTorch (deep learning framework), transformers from Hugging Face (for handling LLMs), and faiss-cpu (for efficient similarity search and clustering of dense vectors).
- Vector Database: A vector database like Epsilla is crucial for managing and querying embeddings, which are numerical representations of your data that the LLM can understand and use efficiently.
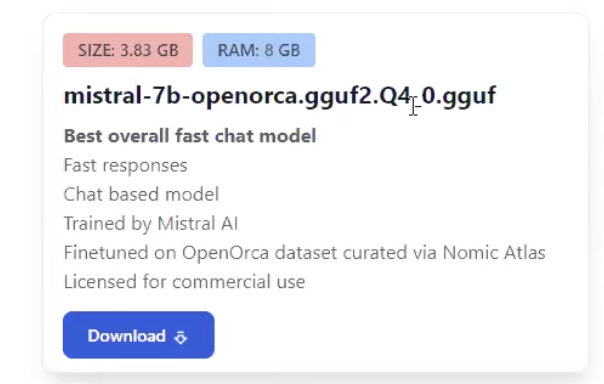
- Pre-trained Models: Select a pre-trained model that suits your needs. In our example, we use Mistral.
- Inference Engine: Tools like Llama CPP facilitate efficient model inference, especially if you’re leveraging GPU acceleration.
- Chatbot Interface: If you’re deploying a chatbot, you’ll need an interface framework like Streamlit, Rasa, or Botpress that can handle user interactions and integrate with your LLM.
For our environment, we used Visual Studio, Python, Epsilla, Gemma, Mistral, and Llama CPP.
Step 2: Build Your Knowledge Base
Your knowledge base is a set of documentation that your LLM will draw from when coming up with answers to queries and finding solutions.
For our example, we’re using documents related to Amazon SageMaker.
Key Points for Building Your Knowledge Base:
- Ensure that the documentation you gather is directly related to the use case you’ll be addressing with the LLM. This relevance is crucial for the model to provide accurate and useful responses.
- Your knowledge base can include a variety of document types such as manuals, research papers, user guides, FAQs, and even images with embedded text.
We then upload these documents into Visual Studio, our development environment where we can easily write code and give instructions that enable the deployment of our LLM.
📚 You may also like: LLM Use Cases: One Large Language Model vs Multiple Models
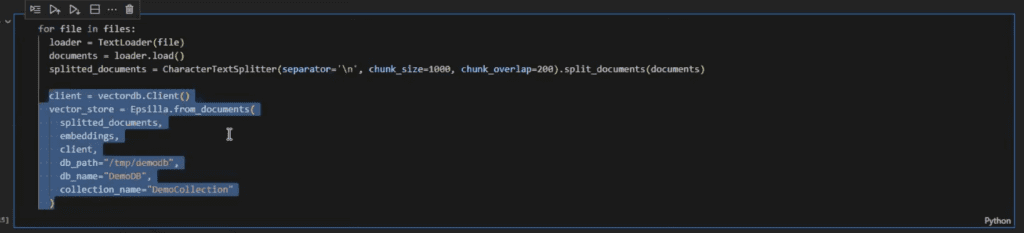
Step 3: Embed Documents into Your Vector Database
This process involves breaking up your documents into manageable chunks, converting them into embeddings, and storing these embeddings in a vector database for efficient retrieval.
Embedding transforms your textual data into numerical vectors that capture the semantic meaning of the text.
These vectors allow the LLM to efficiently search and retrieve relevant information based on the input query.
In our example, we broke up the documents into chunks of 1000 characters which you can see in the code below:
Step 4: Embed the User-Interface Question into the Vector Database
For your LLM to accurately respond to questions, you need to process the user’s query into the vector database.
This step ensures that the LLM can pull together the correct contextual information from the embedded documents to generate an accurate and relevant response.
Steps to Embed User Queries:
1. Process the Query:
Convert the user’s question into an embedding using the same model and method used for your document chunks. This ensures that the query and documents are in the same vector space, allowing for accurate similarity searches.
2. Retrieve Relevant Information:
Use the query embedding to search the vector database and retrieve the most relevant document chunks. This step ensures that the LLM has access to contextually relevant information.
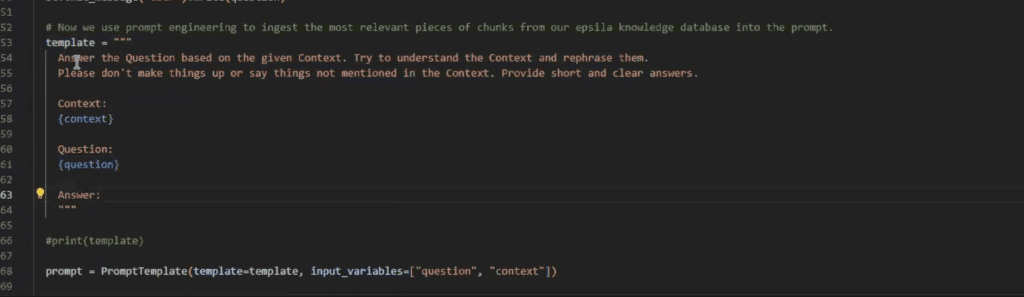
3. Formulate a Templated Prompt:
Create a template that combines the user’s query with the retrieved document chunks. This prompt guides the LLM in generating a response that is informed by the relevant context.
This is the templated prompt we provided in our Sagemaker Wizard example:
Step 5: Use a Pre-Trained LLM
I already included this as part of step 1 where you would have selected all the software you needed to deploy an LLM. But I want to take the time to highlight the importance of this step and to provide guidance on how to do so.
Your pre-trained LLM is a critical part of how well your use case works. And that’s because pre-trained LLMs have been built for different purposes.
You need to find one that performs well for your purpose.
A good place to start is by looking through the Hugging Face repository or in GPT4all.
When selecting your model you should consider:
- Task Requirements: Ensure the model is suitable for the type of tasks you need to perform.
- Model Size: Larger models generally provide better performance but require more computational resources.
- Performance Metrics: Evaluate models based on benchmarks and performance metrics relevant to your use case.
We used Mistral and Gemma in our example with Sagemaker queries because they are suitable for text based queries and facilitate nuanced understanding.
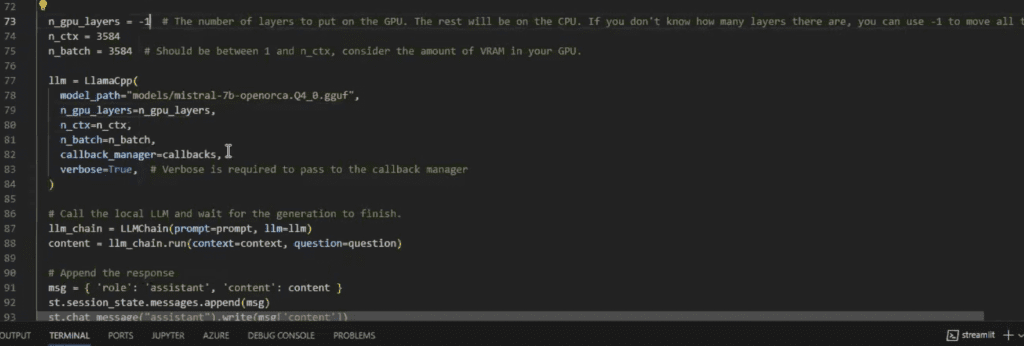
Step 6: Import the Layers of the Model into your Local GPU
Once you’ve selected and prepared your pre-trained LLM, the next step is to import the model into your local GPU.
This step involves configuring the model to work efficiently with your hardware, ensuring optimal performance for your use case.
Steps to Import the Model
1. Configure GPU Settings:
Ensure your system is equipped with the necessary GPU drivers and CUDA toolkit compatible with your GPU model.
Adjust parameters such as window length and batch size to optimize performance.
2. Set Parameters:
Window Length: This defines the context size the model uses for processing. A typical window length might be around 1024 tokens, but this can vary based on your specific needs and the capabilities of your GPU.
Batch Size: This determines the number of tokens processed in each batch. Adjusting the batch size helps balance memory usage and processing speed. A common starting point is 8-16 tokens per batch, but you may need to tweak this based on your hardware capabilities.
3. Import the Model Using LangChain:
LangChain provides a streamlined way to manage and run your LLM. It simplifies the process of loading and configuring your model for optimal performance.
Step 7: Append the Response and Get Your Results
Up til now, we’ve just been setting the LLM to function. Now we need to actually run it. This step actions everything you’ve set it up to do and runs through the process we showed you earlier, in the sequence it needs to be completed in: This is what happens:
- User Query: The user inputs a query that the system needs to address.
- Query Embedding: The query is transformed into an embedding and used to search the vector database.
- Context Retrieval: The most relevant document chunks are retrieved and combined with the query.
- Prompt Formulation: A templated prompt provides context for the LLM alongside the user query.
- Response Generation: The LLM generates a response based on the prompt.
- Display Result: The final response is formatted and displayed or returned to the user.
In our example, the output looks like this:
If you’re feeling overwhelmed by the steps and choices before you, I want to stress that you don’t have to navigate them on your own.
At HatchWorks AI we help build, deploy, and fine-tune AI solutions that put their business ahead. You have two options, let us build it for you or teach you ways to be more efficient as you build.
Custom software solutions built for you with Gen-DD™
Let us handle the development so you can focus on your core business.
Using our (Gen-DD) methodology, we create bespoke software solutions in a faster, more efficient, and cost-effective way.
Accelerate Your Development Process with Gen-DD™
Let us teach you how to build more efficiently with the power of AI.
We empower you to use our Gen-DD methodology, enabling your team to build software more efficiently.
Key Considerations When Deploying an LLM
As with any business decision, there are a few considerations to make which will determine if, when, why, and how you will deploy an LLM.
Here’s what I would—and do—consider every time:
Hardware Requirements – Do You Need a GPU?
For most LLMs, especially large ones, a powerful GPU is recommended due to its parallel processing capabilities, which significantly speed up training and inference tasks.
You can use a CPU but the performance will be considerably slower. For smaller models or less intensive tasks, a high-performance multi-core CPU might suffice.
Model Selection – Do You Go Open or Closed?
Honestly, it’s up to you but I find pre-trained models faster and easier to tailor and implement to my needs.
A pre-trained model is trained on vast amounts of data and can be fine-tuned to specific tasks with relatively less effort. They are available from repositories like Hugging Face.
📚 Need more help making the choice between open or closed? Check out our article: Open-Source LLMs vs Closed: Unbiased 2024 Guide for Innovative Companies
Keeping Things Private – Data Security Concerns
Security is one of the major reasons a business would deploy locally.
It keeps data in-house, effectively reducing risks associated with data breaches and ensuring compliance with data protection regulations. And it means complete control over the model.
This is in contrast to using a cloud-based model which provides ease of scalability and reduces the burden of hardware maintenance but raises concerns about data security and potential compliance issues.
Costs – How Much for How Long?
I think of the costs of deploying an LLM in two phases: initial set-up and ongoing operations.
Initial Setup Costs:
- Significant upfront investment in purchasing powerful GPUs, ample RAM, and high-speed storage.
- Costs for necessary software licenses and tools required for setting up and running the LLM.
Ongoing Operational Costs:
- High-performance hardware, especially GPUs, can consume considerable power, leading to increased electricity bills.
- Regular maintenance and potential upgrades for hardware to ensure optimal performance.
- Depending on the software and models used, there may be ongoing licensing costs.
Even with these costs, local deployment offers long-term savings by eliminating the need for recurring subscription fees associated with cloud services and allows you to manage and predict your costs more accurately over time.
FAQs for Deploying an LLM
What are the benefits of deploying your own LLM?
Deploying an LLM:- Keeps sensitive data in-house, reducing the risk of data breaches.
- Gives greater control over the model and its environment, allowing for extensive customization and fine-tuning.
- Offers potentially faster response times as there is no dependency on external servers.
- Reduces long-term costs associated with recurring cloud service fees, especially for high-frequency usage.
What are the hardware requirements for deploying an LLM?
You’ll need at least 16GB RAM (32GB+ recommended), an SSD with 20GB+ free space, and preferably a GPU for better performance.
What software do I need to deploy an LLM?
Python: The primary language for deploying LLMs, with version 3.8 or higher.
Libraries: Key libraries such as torch for PyTorch, transformers for handling LLMs, and faiss-cpu for similarity search.
CUDA and CuDNN: Necessary for leveraging GPU acceleration.
Development Environment: An IDE like Visual Studio or PyCharm, and version control with Git.
Vector Database: Tools like Epsilla for managing document embeddings.
Inference Engine: Llama CPP for running the model, compatible with both GPU and CPU.
How do I choose the right pre-trained model?
Choosing the right pre-trained model depends on your specific task requirements. Models from the Hugging Face repository offer a wide range of options tailored for different tasks such as text generation or question answering.
Larger models generally provide better performance but require more computational resources.
You also may want to consider models with active communities and good documentation can facilitate easier troubleshooting and support.
What are the security implications of deploying an LLM?
Deploying an LLM locally ensures that sensitive data does not leave your premises, which significantly reduces the risk of data breaches.
This makes it easier to comply with regulatory requirements such as GDPR or HIPAA, as data is kept in-house.
However, it’s important to implement robust security protocols, including encryption, secure access controls, and regular security audits, to protect both the model and the data it processes.
Can I deploy an LLM on a CPU, or do I need a GPU?
While it is possible to deploy an LLM on a CPU, the performance will be significantly slower compared to using a GPU. This might be sufficient for smaller models or less intensive tasks.
However, for most LLMs, especially those used for high-frequency or resource-intensive applications, a powerful GPU is recommended due to its parallel processing capabilities, which significantly speed up training and inference tasks.
Let’s Build Your AI Strategy
Meet with our AI experts to explore your goals and challenges.
We’ll work with you to create a tailored AI Strategy and Roadmap that turns AI into ROI.