Feeling like you’ll get left behind if you’re not automating workflows with n8n?
You’ve seen the posts, the praise, maybe even a few workflows in the wild. n8n, as a workflow automation tool, is taking social media by storm. But when it comes to using it yourself, it’s hard to know where to start.
This guide walks through how to use n8n for real-world workflow automation.
We’ll cover what makes it different, how to build your first workflow, and how to handle advanced use cases like AI agents, web scraping, and custom logic.
| Category | Data Governance | Information Governance |
|---|---|---|
|
Scope
|
Data governance focuses on technical data management for structured and unstructured data
|
Encompasses all information assets, including data, documents, records, and communications. Ultimately, overseeing how data is used and protected
|
|
Goals
|
Data governance emphasizes data quality and usability
|
Information governance prioritizes compliance and risk management.
|
|
Stakeholders
|
Involves IT teams, data engineers, and analysts
|
Involves legal teams, compliance officers, executive leadership, and risk management teams
|
|
Policies and Procedures
|
Defines data collection, storage, access, and disposal standards
|
Establishes enterprise-wide rules for document management, record retention, and ethical information use
|
|
Impact
|
Drives operational efficiency and data-driven decision-making
|
Aligns information use with strategic objectives and regulatory obligations
|
|
Examples of Implementation
|
Centralized data catalog, defined data quality metrics, and clear ownership structures
|
Legal defensibility for deleted records, enterprise retention schedules, and communication governance policies
|
What Makes n8n Different as an Automation Tool?
Most automation platforms are built for ease but not for depth. You get limited visibility, rigid integrations, and pricing models that punish you as you scale. When something breaks, you can’t see why. When your use case grows, you hit a wall. And when you want flexibility, you’re stuck waiting for someone else to build the integration you need.
n8n doesn’t work that way. Here’s how it’s different:
- You can see everything. n8n doesn’t hide your logic behind a simplified UI. Every step, input, and output is visible and inspectable. You know exactly what your workflow is doing and why.
- You own your automation. Unlike SaaS tools that lock you into their cloud and pricing model, n8n is open-source and self-hostable. You choose where it runs, how it integrates, and who sees your data.
- It scales with complexity. Whether you’re managing a simple webhook or orchestrating dozens of steps with conditionals, subflows, and parallel branches—n8n handles it. You’re not forced to simplify just to make the platform work.
- It’s made for teams who like to build. n8n supports JavaScript functions, custom HTTP calls, environment variables, and external APIs right out of the box. If you can build it, n8n won’t get in your way.
- You don’t pay to experiment. With most tools, more runs = more cost. With n8n, there’s no per-run pricing. Whether you’re testing a flow or automating thousands of events a day, your costs stay predictable, and importantly, low.
And unlike many other tools, n8n supports advanced automation patterns out of the box, including:
- Web scraping workflows
- LLM/API orchestration
- Data enrichment
- Multi-system integrations
- Self-hosted agent execution
If other automation tools feel like they’re built for small, simple tasks, that’s because they are. n8n is built for what happens next.
Key Use Cases for n8n Workflow Automation
What is a workflow in n8n?
N8n defines it as: “a collection of nodes that automate a process. Workflows begin execution when a trigger condition occurs and execute sequentially to achieve complex tasks.”
The first step on your journey to n8n workflow automation is to take inspiration. That’s why this section covers some key use cases. Here are the common ways teams like yours are using n8n automation:
Personal Productivity and Task Management
Instead of starting the day by checking your calendar, task app, inbox, and chat messages one by one, you can build a workflow that pulls what’s important from each and sends it to you in one place.
A good example of this is a daily email summary. In this setup, n8n checks your Gmail inbox every morning, pulls in the subject lines of any new messages, and sends them to GPT-4 to summarize. You get one clean message with a short overview of what’s in your inbox.
You can also use n8n to stay on top of your to-dos without having to check your task app every hour.
For example, this workflow pulls tasks from Todoist that are due today, filters out anything already completed, and sends you a summary on Slack or email first thing in the morning.
You can add conditions to only include tasks with certain labels or from specific projects. If a task is overdue, it can be highlighted or bumped to the top of the list. The goal is simple: make sure the right tasks are in front of you when the day starts.
Business Operations and CRM
When a new lead comes in, there’s usually a bunch of small steps that follow. Such as: checking if they’re already in the CRM, assigning them to someone, sending a notification, maybe adding a task to follow up.
With n8n, you can automate all of that. A form submission triggers the workflow. It looks up the lead in your CRM. If they’re new, it creates a record, adds any extra info you need, assigns it, and lets your team know. If nothing happens after a day, it can remind someone or reassign it.
And you don’t do a thing other than set it up.
DevOps and Home Lab Automation
If you manage your own infrastructure, whether it’s for work or a home lab, there are always small tasks that eat up time. These include restarting containers, checking system health, or running cleanup scripts.
With n8n, you can set up workflows to automate those tasks. For example, a workflow can check if a container is running. If it’s not, it restarts it, logs the event, and sends a notification to Telegram or Slack. You can also trigger scripts manually or through webhooks to perform updates or maintenance tasks.
These workflows aren’t meant to replace full observability tools, but they’re useful for basic coverage.
There’s a great example of this in a home lab automation write-up that shows how to monitor and manage Docker containers using n8n workflows.
Building Your First n8n Workflow
With use cases to take inspiration from, it’s time to have a go at building a workflow of your own.
This section walks you through how to do that, step by step. You don’t need to know how to code, and you don’t need a perfect use case. You just need one task you’d rather not do manually.
Start with One Simple Task
Before you dive into complex workflows, pick something small and predictable. The goal is to learn how n8n works by solving a problem you already understand.
For example, you could:
- Send yourself a summary of tasks every Friday
- Log form submissions to a spreadsheet
- Get a daily message with the weather or unread emails
It doesn’t have to be impressive. It just has to run and help you see how triggers, data, and actions connect. Once that’s working, you can start building on top of it. Which leads us to our next step:
Understand the Core Parts of a Workflow
Every workflow in n8n follows the same basic structure. Something starts it, something happens, and sometimes there’s logic that decides what happens next. Behind it all are nodes.
There are three main types of nodes to know:
- Trigger nodes – These kick off the workflow. A trigger could be something like a webhook, a new calendar event, or a scheduled time.
- Action nodes – These perform tasks like sending an email, updating a row in Google Sheets, or posting a message to Slack. Most workflows will have several of these chained together.
- Logic nodes – These add conditions and control what happens next. You can create branches, check values, or stop the workflow based on what’s coming through.
You can combine these however you need. You don’t need to use all three in every workflow, but understanding them makes it easier to plan and troubleshoot.
Build Visually
n8n uses a visual editor where you drag nodes onto the canvas and connect them. Each node represents a step in your workflow.
- Start by placing a trigger node. This defines when the workflow runs.
- Add action or logic nodes one by one to handle the steps that follow.
- Connect each node by dragging from one to the next in the order you want things to happen.
Test and Iterate
Once you’ve connected a few nodes, it’s time to run the workflow and see what happens. n8n gives you tools to test each step and look at the data moving through it.
You can:
- Click “Execute Node” to test a single step
- Run the full workflow and watch it in real time
- Open the “Execution” tab to review past runs and see where something broke (if it did)
Most workflows won’t work perfectly the first time, and that’s fine. You’ll usually find something you want to tweak or improve. Try one part at a time, check the outputs, and adjust as needed.
The more you build, the faster this process becomes.
Example: A Real n8n Workflow We Built at HatchWorks AI
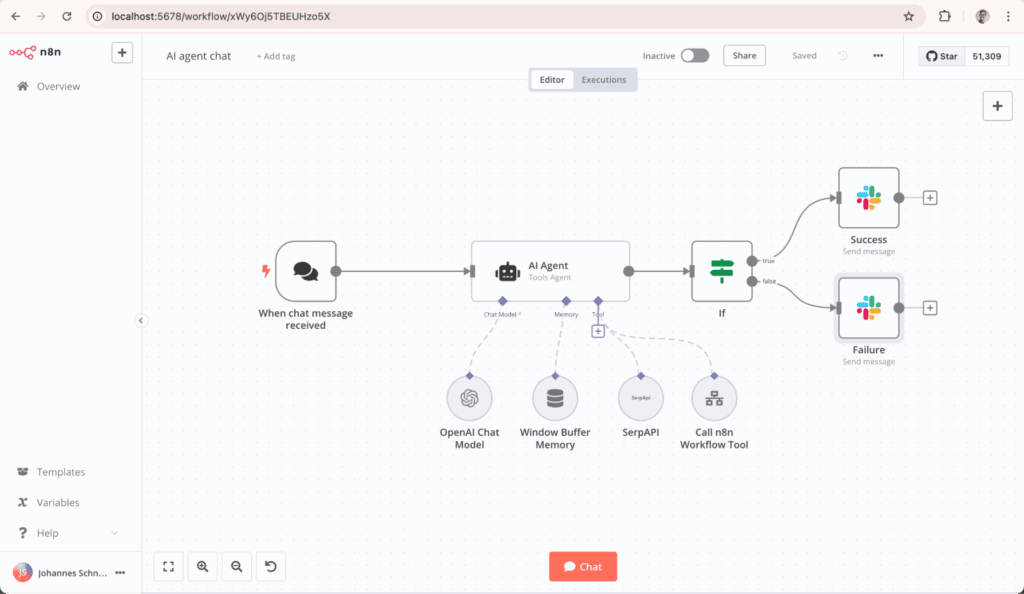
To make this concrete, here’s a real workflow our team built during an internal lunch-and-learn: an AI-powered assistant that routes requests to different “agents” for tasks, email, and calendar management.
The goal was simple: give a user one place to type natural language requests like “Can you send me a reminder about tomorrow’s meeting?” and let n8n handle the rest.
Step 1: Define the problem
We started by writing down the one job this workflow should do:
From a single chat interface, understand what the user wants, route the request to the right agent, and send the correct email reminder using our existing contact list.”
That gave us three clear responsibilities:
- Understand the user’s message and decide what type of request it is
- Look up the right contact details when needed
- Send an email reminder and log what happened
This mapped directly to how we structured the workflow.
Step 2: Map out the agents and nodes
Before touching n8n, we sketched the pieces:
- Orchestrator agent – Reads the user’s message and decides whether it should go to the task agent, email agent, or calendar agent.
- Email agent – Knows how to send emails and when to fall back to a contact list if no email address is provided.
- Contact list – A simple Google Sheet with names and email addresses.
- Chat node – A front end in n8n where we can type messages and see responses during testing.
In the editor, this looks like a central orchestrator node at the top, with branches going out to the email, task, and calendar workflows.

Step 3: Build the main flow visually
We then translated the sketch into an n8n workflow:
- Trigger: A Chat node receives the user’s message.
- Orchestrator node: The message is passed into the orchestrator agent, which uses a system prompt to decide where to route the request. For example, if it sees “send a message” or “remind,” it picks the email agent.
- Branching: Based on the orchestrator’s decision, the flow moves to the email agent, task agent, or calendar agent path.
- Email agent path:
- If the user provides an email address, the agent sends the reminder directly.
- If not, it calls a Google Sheets node to look up the user in the contact list, then sends the email if a match is found.
Step 4: Connect data sources
To keep things simple, we used a Google Sheet as our address book:
- A Google Sheets node pulls the contact list from Drive.
- The email agent checks whether the user’s name is in the sheet.
- If it finds a match, it passes the email field into the “Send message” node.
- If it doesn’t, the workflow returns a friendly “I couldn’t find that contact” message instead of failing silently.
This let us test the flow with real data, without needing a dedicated contacts service.
Step 5: Test the workflow end to end
With the nodes wired up, we ran through a few real prompts, such as:
- “Can you send a reminder to Brian about tomorrow’s meeting?”
- “Remind me about tomorrow’s meeting” (no email given, so the agent looked it up in the contact list).
For each run, we watched the execution in n8n:
- The Chat node captured the message
- The Orchestrator routed it to the email agent
- The email agent either used the provided address or pulled one from Google Sheets
- The “Send email” node delivered the final reminder
Step 6: Add logging and iterate
Finally, we added a small logging layer:
- A Google Sheets or database node stores each request and whether the email was sent successfully.
This gives us a lightweight history we can analyze later for accuracy or usage patterns. From there, improving the workflow became easier. We could tweak the orchestrator’s rules, refine prompts, or expand the agents, all without changing the basic structure.
Advanced n8n Workflow Automation Tips
Once you’ve built a few basic workflows, you’ll start running into new challenges like handling errors, reusing logic, or keeping things organized as they grow. This section covers a few practical ways to make your workflows cleaner, more reliable, and easier to scale.
Keep Things Manageable With Sub-Workflows
As your workflows grow, they get harder to read, test, and maintain. It’s easy to end up with dozens of nodes in one giant visual chain, especially if you’re repeating the same logic in multiple places.
Handle Errors and Add Retry Logic
Not every step in your workflow will run perfectly. An API might time out, a field might be missing, or a service might be temporarily down. Without any error handling, that single failure can break the whole flow.
n8n gives you a few ways to handle this:
1. Use built-in error paths on any node
Every node in n8n has a hidden second output labeled “error.” You can connect this to a fallback path. If the node fails, n8n will skip the main flow and follow the error route instead.
Example:
- Use an HTTP Request node to call an API.
- Connect the error output to a Set node that logs the failure or sends a Slack alert.
- Optionally, reattempt the request using a delay and loop structure.
2. Use the Error Trigger for global failure handling
The Error Trigger node activates when any part of a workflow fails (unless already caught). You can use this to send alerts, log the error, or store failed input for retrying later.
This is useful in workflows that don’t need to stop everything when one task fails.
3. Control retries with delays and IF conditions
You can use an IF node to check a response (e.g., status code isn’t 200), then add a ‘Wait’ node and loop back to retry the step once or twice before giving up. This is useful for flaky APIs or rate-limited services.
n8n solves this with the ‘Execute Workflow’ node. It lets you break your automation into smaller, separate workflows that can be reused or swapped out.
When to use it:
- You’re repeating the same steps in different workflows (e.g., formatting dates, sending alerts, checking for duplicates).
- You have a big flow that’s getting messy, and you want to isolate one piece.
- You want to test or deploy one piece of logic without touching everything else.
How it works:
- Create a new workflow that performs a single function (e.g., send a Slack message with consistent formatting).
- In your main workflow, drag in the ‘Execute Workflow’ node and point it to that sub-workflow.
- Pass in only the data that the sub-workflow needs.
It keeps your main flows clean, makes it easier to test small pieces in isolation, and gives you building blocks you can reuse across different automations.
Use the Set Node for Cleaner Debugging
When a workflow breaks or behaves unexpectedly, it’s often because a value isn’t what you thought it was, or because something upstream changed the shape of the data.
The ‘Set’ node is your go-to tool for seeing and shaping data before it moves on. It lets you define exactly what gets passed to the next node.
APIs and webhooks often return messy or deeply nested objects. If a later step expects a different structure or field name, your workflow might fail, or worse, do the wrong thing without error. The Set node helps you reduce that risk by keeping the data clean and predictable.
How to use it:
- Drop a Set node right after a trigger or HTTP request.
- Use it to strip away unused fields, rename keys, or create new ones based on existing values.
- Run the node and inspect the output. It’s easier to debug smaller, predictable payloads.
Bonus: You can also use the Set node for mock data when testing flows, so you don’t need to trigger the full upstream process each time.
Swap Out Nested IFs for Switches
As workflows grow, it’s common to stack multiple ‘IF’ nodes to handle branching logic. Especially when you’re routing tasks based on things like priority, status, or category.
But chaining IF nodes quickly gets hard to read, debug, and maintain.
The ‘Switch’ node, however, lets you check multiple conditions in one step, without needing a long chain of branches. You can see all the paths your data might take in a single node, rather than having to follow a string of IFs.
How to use it:
- Drop in a Switch node when you need to check for more than two conditions.
- Each condition becomes a separate output path (e.g., high, medium, low).
- Connect each path to the actions you want to run for that case.
If you’re doing something like routing support tickets by urgency, sorting leads by location, or filtering records by type, then a Switch is almost always the cleaner choice.
Manage Secrets and Settings With Environment Variables
Hardcoding API keys or config values into your workflows might seem faster, but it creates long-term headaches. It makes your workflows harder to manage across environments and easy to break or leak sensitive info when shared.
n8n supports environment variables so you can keep secrets and settings out of your workflow logic entirely.
How to use them:
- Define variables in your .env file or hosting platform (e.g., STRIPE_SECRET_KEY=…).
- Use them inside workflows by referencing them like this: {{ $env.STRIPE_SECRET_KEY }}
- Apply them in any field that supports expressions: headers, URLs, payloads, or logic branches.
Leveraging AI Agents in n8n Workflows
AI tools like GPT can slot into your automations to summarize content, draft responses, clean up messy data, and even help make decisions.
In n8n, you can connect to these models through API calls and trigger them exactly when you need them. Here’s how.
Call GPT or Claude for Text-Based Tasks
One of the simplest ways to use AI in a workflow is to send it some text and get a helpful response back. With tools like OpenAI’s GPT or Anthropic’s Claude, you can do things like:
- Summarize long articles, emails, or transcripts
- Rewrite or clean up user-submitted content
- Generate draft replies or templated messages
- Extract bullet points, action items, or sentiment
All you need is an HTTP Request node that calls the model’s API with your input and prompt. Then you can use the response in whatever step comes next—send it, store it, or pass it downstream.
Trigger AI Steps Based on Workflow Conditions
Sometimes you only want to involve a model when a specific condition is met, like when a message includes certain keywords or when a task hasn’t been completed in time.
In n8n, you can control this with IF, Switch, or expression logic. That way, the AI only runs when it’s actually useful, saving compute time and keeping your flows efficient.
For example:
- If a support ticket includes negative sentiment, trigger GPT to summarize and flag it for review.
- If an incoming message is longer than 1,000 characters, ask Claude to distill the key points.
- If a form is missing context, prompt GPT to suggest a clarification question automatically.
Use AI to Categorize or Enrich Data
AI models are great at recognizing patterns, classifying inputs, and filling in missing details. This makes them useful for enriching or cleaning up the data flowing through your workflows.
You can pass structured or semi-structured data into an AI prompt and get back something cleaner, more organized, or more useful.
Here are some examples:
- Tag feedback comments as “bug,” “feature request,” or “general praise” based on the text.
- Extract key details from messy user inputs (e.g., product names, dates, or urgency levels).
- Normalize inconsistent fields—like turning various job titles into a standard set of roles.
You can then use those outputs to route tasks, populate dashboards, or feed other systems.
Web Scraping and Data Extraction with n8n
Sometimes, the data you need is scattered across web pages. With n8n, you can pull that data in directly using HTTP requests and HTML selectors, then run it through the same automation flow as everything else. Here’s a quick walk-through of what’s possible.
Set Up a Basic Web Scraper
You only need two core nodes to scrape static web content: HTTP Request and HTML Extract.
- Use the HTTP Request node to load the page you want to scrape.
- Then add an HTML Extract node to pull the content you care about, such as headlines, links, product names, prices, etc.
The extract node uses CSS selectors to target elements. You can inspect a page in your browser, copy the selector you need, and paste it in.
From there, test the output. You’ll often get arrays or nested data, and that’s totally normal. The next step is cleaning that up.
Clean and Structure Scraped Data
Raw scraped data almost always needs a little cleanup. Maybe there’s extra whitespace, weird formatting, or fields that come through as arrays when you only need the first item.
You’ve got a few tools in n8n to handle that:
- Use the Set node to rename fields, flatten arrays, or drop things you don’t need.
- For anything more complex—like trimming strings, parsing values, or reformatting dates—add a Function or Code node.
- If you’re looping over a list of items (like multiple products or headlines), use the SplitInBatches node to process each one cleanly.
This step saves you from having to clean things later in Sheets or your database. And it keeps downstream automation from breaking when data doesn’t match the format you expected.
Store the Cleaned Data Where You Need It
Once your scraped data is cleaned up, the next step is saving it somewhere useful. You can send it straight into Google Sheets, Airtable, a database, or whatever tool your team already works with.
To avoid duplicates, it’s a good idea to add a bit of logic, like checking if a row with the same title or URL already exists. You can also timestamp each entry so you know when it was scraped.
If this is a recurring task, set up a Cron node to run the workflow on a schedule. That way, the data stays up to date without you having to touch anything.
Visualizing Workflow Performance and Logs
You’ll eventually hit a point where a workflow runs but doesn’t do what you expected. Maybe a message doesn’t send, or some data goes missing. With most automation tools, you’d be stuck guessing what broke.
n8n gives you full visibility into every execution. You can see what triggered the run, which nodes were executed, what data came in, and what went out.
The Executions list shows a full history of runs, including failed ones. You can click into any run to trace it from start to finish. Each node is clickable, so you can inspect exactly what it did, what it received, and how long it took.
This kind of transparency turns debugging into a process rather than a guessing game. You fix problems faster because you have the information to know what went wrong.
It also helps you optimize. Slow step? Bottleneck? You’ll see it. And if something failed mid-run, you can retry the whole thing with the same input and no need to retrigger it manually.
Integrating Google Sheets in n8n Workflows
Great news for Google Sheets users: with n8n, you can turn it into a functional part of your automation. Here are some examples:
- Auto-update product inventory from scrapers or supplier APIs
- Track inbound leads from web forms, email tools, or CRMs
- Log survey responses or support tickets for later review
- Maintain campaign calendars or content publishing schedules
- Generate running task lists from Trello, Asana, or Notion
- Build team dashboards with real-time inputs from other tools
- Record social media mentions or keyword alerts
- Create daily or weekly digests of activity across tools
- Archive Slack conversations or meeting notes
- Monitor uptime, check-in logs, or webhook triggers
- Track internal requests, bug reports, or feature suggestions
- Maintain a changelog for product updates or deployments
Here’s how to set up the most common Google Sheets automations in n8n, starting with how to watch for changes and append new rows.
Watch and Append Rows Automatically
If you want to use Google Sheets as a running log or data collector, this is the setup you’ll use most often.
Start with a trigger, something like a form submission, a webhook, a scraped record, or a scheduled check. Then, after processing or formatting the data, use the Google Sheets node in “Append” mode to write a new row to the sheet.
You can include fields like timestamps, IDs, source links, or status values. It works well for tracking inputs over time, logging events across tools, or just keeping a historical record of what your workflow is doing.
Once it’s live, the sheet updates itself.
Read From Sheets to Power Other Workflows
n8n can pull in data from a Sheet and use it to drive the rest of a workflow. You might have a list of URLs to scrape, campaigns to launch, or users to notify. Instead of triggering one item at a time, you can run a workflow that loops through each row and performs actions for every entry.
You’ll typically start with a Cron node (for scheduled runs) or a manual trigger, followed by a Google Sheets Read node. From there, use SplitInBatches to process one row at a time, or filter based on column values to focus on what’s relevant.
Using Docker Compose to Manage n8n Environments
If you’re self-hosting n8n, Docker Compose is one of the easiest ways to run it reliably, especially if you want to pair it with other services like a database, reverse proxy, or monitoring stack.
Compose lets you define everything in one file, spin it up with a single command, and keep your environment consistent across machines.
Key Benefits
Docker Compose gives you a clean way to manage your entire n8n environment. Here’s why teams use it:
- Everything in one file – Define your app, database, volumes, and environment variables in a single YAML file. No loose pieces.
- Repeatable setup – Spin up identical environments across dev, staging, and production with minimal changes.
- Easy service integration – Pair n8n with Postgres, Redis, Mailhog, or anything else your workflows rely on.
- Isolated, inspectable containers – Each part of the stack runs independently, making it easier to debug, restart, or update.
- Portable and shareable – Your whole environment lives in version-controlled config, not just on someone’s laptop.
- Quick teardown – Need a clean slate? One command removes everything safely.
Basic Setup Example
Here’s a minimal docker-compose.yml to get you started. It runs n8n alongside a Postgres database for persistent storage:
					version: '3.7'

services:
  postgres:
    image: postgres:13
    environment:
      - POSTGRES_USER=n8n
      - POSTGRES_PASSWORD=n8n
      - POSTGRES_DB=n8n
    volumes:
      - postgres-data:/var/lib/postgresql/data

  n8n:
    image: n8nio/n8n
    ports:
      - "5678:5678"
    environment:
      - DB_TYPE=postgresdb
      - DB_POSTGRESDB_HOST=postgres
      - DB_POSTGRESDB_PORT=5432
      - DB_POSTGRESDB_DATABASE=n8n
      - DB_POSTGRESDB_USER=n8n
      - DB_POSTGRESDB_PASSWORD=n8n
      - N8N_BASIC_AUTH_ACTIVE=true
      - N8N_BASIC_AUTH_USER=admin
      - N8N_BASIC_AUTH_PASSWORD=securepassword
    depends_on:
      - postgres
    volumes:
      - n8n-data:/home/node/.n8n

volumes:
  postgres-data:
  n8n-data:
This gives you a working instance with authentication and persistent data. You can extend it with reverse proxies (like Traefik or Nginx), SSL, or external credential stores as needed.
If you’re deploying to a provider like DigitalOcean, AWS, or Render, this setup can be adapted with minor changes.
Connecting External APIs and Webhooks
One of n8n’s biggest strengths is how easily it connects to different platforms. Whether you’re working with Stripe, Twilio, Calendly, or a niche internal tool, you can pass data between systems without needing a separate integration layer.
You can trigger workflows with incoming webhooks, use the HTTP Request node to call external APIs, and even handle authentication with custom headers and tokens. For APIs that require secure keys, you can store credentials as environment variables to keep them safe and reusable.
This is especially valuable if you’re self-hosting and want full control over how your own data is accessed, stored, and passed between services.
Automating with Time Triggers and Cron Jobs
If you’re automating recurring tasks, Cron is one of the simplest tools for process automation. The Cron node in n8n lets you trigger workflows on a schedule.
You might use it to:
- Email a digest of tasks every Friday at 4 pm
- Back up data from one platform to another overnight
- Run cleanup jobs once a week to archive or delete stale entries
- Check for new items in an RSS feed every hour
Unlike basic schedulers, n8n lets you chain actions, filter results, and branch logic within the same workflow. That means you can do more than just “run a script”, you can build reliable, end-to-end automation with conditional steps and retries.
Our tip: Combine the Cron node with a Set node that adds a timestamp or run label. This helps track execution history in logs or Sheets if you’re building audits or status dashboards.
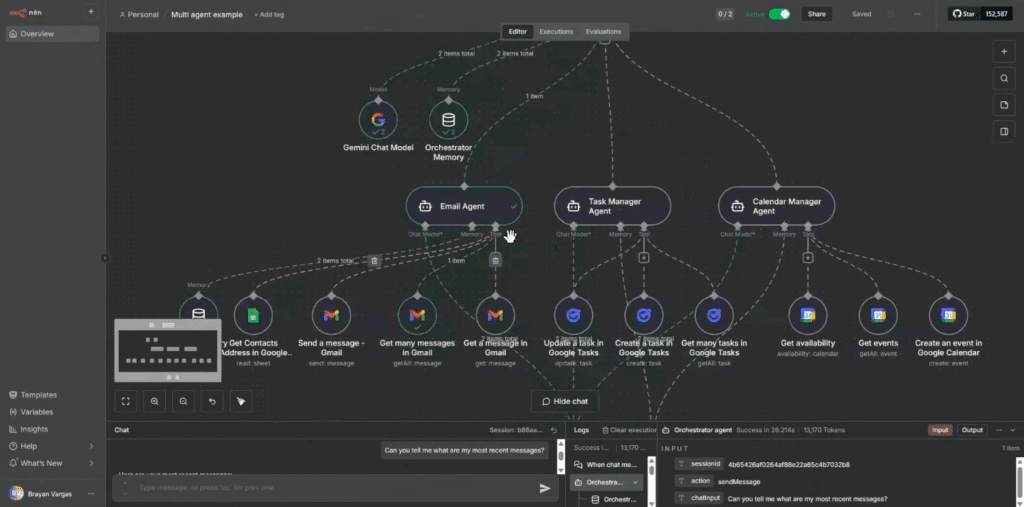
A Real-World Example: Building a No-Code AI Agent with n8n

One of the best ways to understand n8n’s power is to see it in action. At HatchWorks AI, we used it to prototype a fully functional AI agent, built without writing custom code, during a 48-hour internal hackathon.
We started with a simple idea: could we create an agent that receives a task, understands the context, pulls from available tools or data, and generates a useful output?
Using n8n, we wired together:
- A Slack trigger to receive incoming task requests
- GPT-based prompts to understand and respond to tasks
- Google Sheets to log tasks and outputs
- A feedback loop that refined the agent’s responses over time
The result was a working MVP that helped team members offload common requests and repetitive questions, built entirely through n8n’s visual interface, with no traditional backend.
Because we were self-hosting, we had full control over how the agent handled sensitive information, routed decisions, and interacted with other tools. And since everything was built with reusable components, it’s now part of our broader agentic systems framework we’re expanding across internal use cases.
Best Practices for Managing Large n8n Workflows
As your workflows grow, complexity creeps in fast. What starts as a clean series of steps can quickly become a tangle of logic branches, repeated nodes, and hard-to-debug flows.
Here’s how to keep things manageable as you scale:
- Use clear naming and in-flow documentation: Make sure you use descriptive names for each node (e.g., “Format Date for Slack,” not just “Set”) and add notes to explain decision logic or edge cases. n8n’s built-in sticky notes are great for this.
- Break large flows into sub-workflows: If you’re repeating the same logic, like formatting output, validating data, or posting to Slack, split it into a separate workflow and call it with the Execute Workflow node. This makes your flows modular, testable, and easier to maintain.
- Use custom code when you need precision: Most tasks can be done with n8n’s built-in nodes, but sometimes, a bit of custom code goes a long way. The Function node lets you write small, scoped JavaScript functions to manipulate data, calculate values, or bridge between APIs.
Common Pitfalls to Avoid in n8n Workflow Automation
Even though n8n is approachable, it’s easy to run into problems that slow you down, or worse, silently break your workflows. Here are a few common issues to watch out for.
Pitfall: Not using environment variables.
Hardcoding API keys, database URLs, or other credentials directly into nodes is risky. It makes your workflows harder to move between environments, harder to maintain, and less secure.
The fix: Use environment variables instead. You can define them in your .env file or Docker Compose config, and reference them inside any node that supports expressions (e.g., {{$env.API_KEY}}). This keeps secrets out of your workflow logic and gives you flexibility across environments.
Pitfall: Skipping error handling.
Without proper error paths or fallback logic, a single failed request can take down an entire workflow.
The fix: Use the error output on nodes to catch issues locally, or add a global Error Trigger to log problems and alert your team. Even better: use conditional logic and retry loops to make workflows more resilient to timeouts, missing data, or flaky APIs.
Pitfall: Overcomplicating early on.
It’s tempting to make everything dynamic from day one, but resist that urge. Many broken flows come from trying to handle every edge case too early.
The fix: Start with something simple and working, then add conditions, branches, and variables once it’s tested.
Community and Support Resources
n8n has one of the most active open-source communities in the automation space. If you’re ever stuck or just want inspiration, you can head to any one of these resources for help:
- Community Forum – Ask questions, share workflows, or get help debugging
- Discord – Real-time chat with developers, users, and contributors
- GitHub – Submit issues, feature requests, or browse source code
- Templates – User-contributed workflows you can clone and customize
Whether you’re running the cloud version or hosting n8n yourself, these resources are invaluable for troubleshooting, learning best practices, and discovering new use cases.
How n8n Saves You Time Every Week
The real value of n8n shows up after the first few workflows are in place.
Maybe you start with a basic automation that sends reminders or moves form data into a Sheet. Then you connect your CRM and automatically route new leads. Soon, it’s handling status updates, syncing tools, summarizing inputs, and checking things off for you.
It adds up. One less follow-up to send. One less update to forget. One less process to chase down.
Whether you’re automating for yourself or your team, those small wins stack into real time saved.
Try Out n8n for Workflow Automation
Pick something small and repetitive you do each week and try building it in n8n.
Need to go further? HatchWorks AI can help you deploy and scale automation across your team.